


Overview
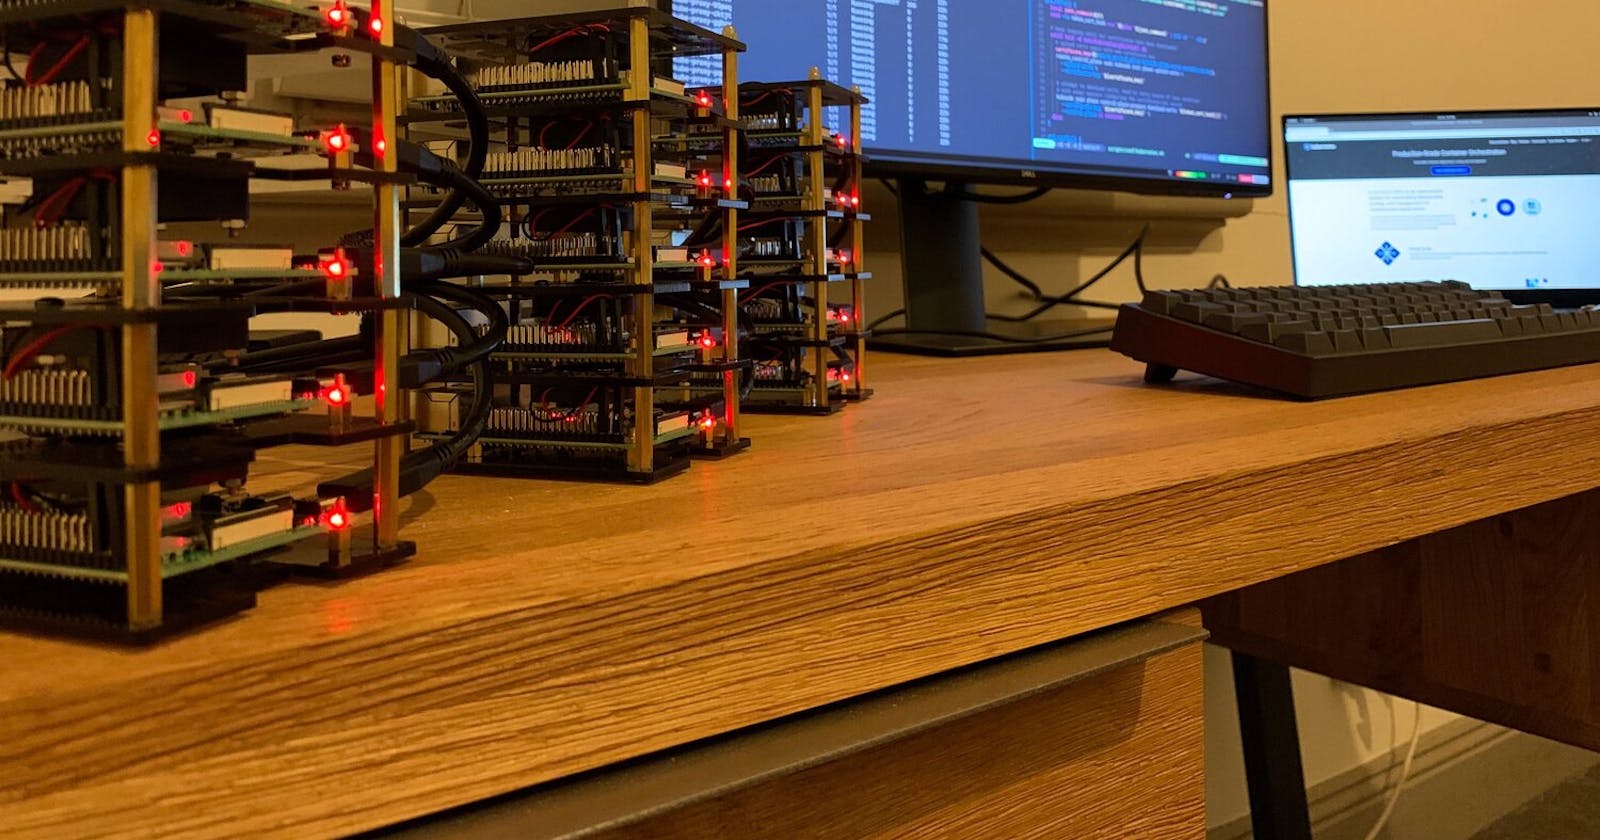
Kubernetes is one of orchestration system which is getting popular for the last five years. Google initially makes it, but now it’s maintained by its vast community worldwide. That’s why it might become a new standard for container orchestration. But having a Kubernetes cluster might be a bit expensive. You have to run at least two or three nodes to run the cluster and try several demo projects on that cluster. That could be overkill for someone. But how if we have a Kubernetes that might run in our local computer? That should be an exciting thing.
Hardware Need ( Must Have )
- Raspberry PI (3/4 Min 2GB RAM): Minimum 2 Nodes ( 1 Master Node, 1 Worker Node )
- Power Supply Unit ( 15W Type-C for Rasp4 or You can use POE Hat )
- Ethernet Cable ( Minimum CAT 5e/6 ( Rasp supports up to 1Gbps ))
- Micro SD Card ( Min 8 GB, Recommended 32 GB )
- Good Case With FAN ( Saves your rasp from dirt and excessive heat )
Software Requirement
- Etcher or Raspberry PI Imager
- Ubuntu 20.4 64Bit ARM ( OS )
Setup Process
Part - 1: Setup RaspberryPIs
- Use Raspberry PI Imager (Recommended) or Etcher to boot ubuntu 20.4 64Bit on SD Card
- When Imager flashes the OS in the SD Card, open the boot drive and create a file name
ssh(Without any extension). - Boot your Rasps
- Check the rasp IP from your router or use Nmap to network scan like this:
nmap -sP 192.168.0.0/24 - SSH to rasps ( Ex: ssh ubuntu@10.0.1.49 )
- Default username :
ubuntu& default password :ubuntu - Do all the basics things you always do with your rasps like setup static IP, setup dotfiles, and other stuff.
Part - 2: Setup MicroK8s
Microk8s provides a single command installation of the latest Kubernetes release on a local machine for development and testing. Setup is quick, fast (~30 sec), and supports many plugins, including Istio, with a single command. Since K8s is not the easiest thing to get started with, having a tool that would make it easy for you to get going is very desirable.
microk8s is strictly for Linux. There is no VM involved. It is distributed and runs as a snap — a pre-packaged application (similar to a Docker container). Snaps can be used on all major Linux distributions, including Ubuntu, Linux Mint, Debian, and Fedora.
A. Setup Docker and Do Some Other Tweaks Before Installing Kubernetes
It is not a surprise we are going to use Docker Engine for the container runtime. Despite there are alternatives in rkt, cri-o, and others. However, at a closer look, we can see Kubernetes uses containers. We use docker because it is the most famous container system and relatively easy to deploy.
# Do this on all of your nodes ( Rasps )

# Install Docker
$ curl -sSL https://get.docker.com | sh


--------------------------------------------------------------------------------------
## Enable cgroups (Control Groups). Cgroups allow the Linux kernel to limit and isolate resources.
# Practically speaking, this allows Kubernetes to manage better resources used by the containers it runs and increases security by isolating containers from one another.

# Inspect Docker
$ docker info
(...)
 Cgroup Driver: cgroups
(...)
# If docker info shows this you need to change Cgroup to systemd, To allow systemd to act as the cgroups manager.

# Create a /etc/docker/daemon.json ( Add the content to that file )
$ vim /etc/docker/daemon.json
{
  "exec-opts": ["native.cgroupdriver=systemd"],
  "log-driver": "json-file",
  "log-opts": {
    "max-size": "100m"
  },
  "storage-driver": "overlay2",
  "insecure-registries" : ["localhost:32000"]
}

# Restart Docker and Inspect Again
$ sudo systemctl restart docker

# Inspect
$ docker info
(...)
 Cgroup Driver: systemd
(...)

# Enable cgroups limit support
# Enable limit support, as shown by the warnings in the docker info output above. You need to modify the kernel command line to enable these options at boot.

# For the Raspberry Pi 4, add the following to the /boot/firmware/cmdline.txt file:

---Manually
cgroup_enable=cpuset
cgroup_enable=memory
cgroup_memory=1
swapaccount=1
---

--or--

---Automatically with sed
# Note the space before "cgroup_enable=cpuset", to add a space after the last existing item on the line
$ sudo sed -i '$ s/$/ cgroup_enable=cpuset cgroup_enable=memory cgroup_memory=1 swapaccount=1/' /boot/firmware/cmdline.txt
---

--------------------------------------------------------------------------------------
## Allow Iptables to see bridged traffic
# According to the documentation, Kubernetes needs iptables to be configured to see bridged network traffic.

# Enable net.bridge.bridge-nf-call-iptables and -iptables6
$ cat <<EOF | sudo tee /etc/sysctl.d/k8s.conf
net.bridge.bridge-nf-call-ip6tables = 1
net.bridge.bridge-nf-call-iptables = 1
EOF

# To check
$ sudo sysctl --system
B. Setup MicroK8s
You may follow the installation instruction of MicroK8S in the official documentation.
Start with installing MicroK8s using Snap which will take only a few seconds.
# Do this on all the nodes ( Only the Installation step, Rest of the steps are for just master server )

## Install MicroK8s
$ sudo snap install microk8s --channel=1.19 --classic

# Add user to group microk8s & give user permission to ~/.kube
$ sudo usermod -a -G microk8s user
$ sudo chown -f -R user ~/.kube

--------------------------------------------------------------------------------------
## Check MicroK8s is Running
$ sudo microk8s.status
microk8s is running
high-availability: no
  datastore master nodes: 10.0.1.2:19001
  datastore standby nodes: none
addons:
  disabled:
    dashboard            # The Kubernetes dashboard
    dns                  # CoreDNS
    ha-cluster           # Configure high availability on the current node
    helm                 # Helm 2 - the package manager for Kubernetes
    metrics-server       # K8s Metrics Server for API access to service metrics
    storage              # Storage class; allocates storage from host directory
    helm3                # Helm 3 - Kubernetes package manager
    host-access          # Allow Pods connecting to Host services smoothly
    ingress              # Ingress controller for external access
    metallb              # Loadbalancer for your Kubernetes cluster
    rbac                 # Role-Based Access Control for authorisation
    registry             # Private image registry exposed on localhost:32000

# Microk8s comes with a set of tools:
microk8s.config
microk8s.docker
microk8s.inspect
microk8s.kubectl
microk8s.start
microk8s.stop
microk8s.disable
microk8s.enable
microk8s.istioctl
microk8s.reset
microk8s.status

--------------------------------------------------------------------------------------
## Check the nodes ( shows only master node )
$ microk8s.kubectl get nodes
NAME     STATUS   ROLES    AGE   VERSION
master   Ready    <none>   33m   v1.19.0-34+09a4aa08bb9e93

## Add an alias for microk8s.kubectl to saving a ton of time
$ sudo snap alias microk8s.kubectl kubectl

## Add AddOns
$ sudo microk8s.enable dns dashboard ingress helm helm3 storage metrics-server prometheus

# To Check
$ microk8s status
microk8s is running
high-availability: no
  datastore master nodes: 10.0.1.2:19001
  datastore standby nodes: none
addons:
  enabled:
    dashboard            # The Kubernetes dashboard
    dns                  # CoreDNS
    ha-cluster           # Configure high availability on the current node
    helm                 # Helm 2 - the package manager for Kubernetes
    metrics-server       # K8s Metrics Server for API access to service metrics
    ingress              # Ingress controller for external access
    helm3                # Helm 3 - Kubernetes package manager
    storage              # Storage class; allocates storage from host directory
  disabled:
    host-access          # Allow Pods connecting to Host services smoothly
    metallb              # Loadbalancer for your Kubernetes cluster
    rbac                 # Role-Based Access Control for authorisation
    registry             # Private image registry exposed on localhost:32000

# To get details of all of your namespaces ( this returns your all the running services, pods, deployements and namespaces etc)
$ sudo microk8s.kubectl get all --all-namespaces
C. Access the Kubernetes Dashboard
# We use the headless OS, So we have no option to access services other than exposing to the internal network.
# By default Kubernetes dashboard is not accessible on the local network, but if you were using raspbionOS ( GUI ), you could access the clusterIP in your Raspberry pi.

# --Exposing--
$ kubectl -n kube-system edit service kubernetes-dashboard
# Change type: ClusterIP to NodePort

# Get service port
$ microk8s.kubectl --namespace=kube-system get service kubernetes-dashboard
NAME                   TYPE       CLUSTER-IP       EXTERNAL-IP   PORT(S)         AGE
kubernetes-dashboard   NodePort   10.152.183.188   <none>        443:30355/TCP   22m
# Dashboard Access : https://MasterServer:Port ( Ex: https://10.0.1.86:30355 )

--------------------------------------------------------------------------------------
## Kubernetes dashboard needs authentication to access to the dashboard
# Method 1 : Generate Token
$ token=$(microk8s kubectl -n kube-system get secret | grep default-token | cut -d " " -f1)
$ microk8s kubectl -n kube-system describe secret $token
# Copy Token and Paste on Dashboard Login

# If you again need this token
$ sudo microk8s.kubectl -n kube-system get secret
# Look for something like this kubernetes-dashboard-token-r62xm

$ sudo microk8s.kubectl -n kube-system describe secret kubernetes-dashboard-token-r62xm
# Shows Secret on Terminal Window

--or--

# Method 2 : Setup a Proxy
# To Setup Proxy
$ sudo microk8s.kubectl proxy --accept-hosts=.* --address=0.0.0.0 &

# Edit Dashboard Yaml
$ sudo microk8s.kubectl -n kube-system edit deploy kubernetes-dashboard -o yaml

# Add ( - --enable-skip-login )
spec:
  containers:
    - args:
      - --enable-skip-login
# when login to dashboard just use ( skip ) option
# Access the server ( Master Server IP: 10.0.1.86 )
# http://10.0.1.86:8001/api/v1/namespaces/kube-system/services/https:kubernetes-dashboard:/proxy/
--------------------------------------------------------------------------------------
D. Add Nodes To The Cluster
# On Master Server
$ microk8s add-node
# It give join command like this: microk8s join 10.0.1.86:25000/6cae23f7273dc6700f439f8c19abc7de

# On Worker Nodes
$ microk8s join 10.0.1.86:25000/6cae23f7273dc6700f439f8c19abc7de

# To Check
$ microk8s kubectl get nodes
NAME     STATUS   ROLES    AGE     VERSION
master   Ready    <none>   64m     v1.19.0-34+09a4aa08bb9e93
node1    Ready    <none>   2m49s   v1.19.0-34+09a4aa08bb9e93
E. Deploy Some Fun
E1. Install Portainer
Portainer is a lightweight management UI that allows you to manage your different Docker environments easily. Portainer provides an easy and straightforward solution for managing Docker containers and Swarm services through a web interface. Portainer supports a wide range of features for managing the Docker containers, such as controlling the creation and deletion of Swarm services, user authentication, authorizations, connecting, executing commands in the console of running containers viewing containers’ logs.
## Install Portainer

# Using Arkade ( Works on arm & amd64 )
# If Arkade shows cluster unreachable, use (kubectl config view --raw >~/.kube/config)
$ curl -sLS https://dl.get-arkade.dev | sudo sh
$ arkade install portainer
# Access Portainer UI on http://http://10.0.1.86:30777 ( Master Server IP : 10.0.1.86 )

# If you are using ( arm64 ( 64 bit OS on Rasps ))
$ curl -LO https://raw.githubusercontent.com/portainer/portainer-k8s/master/portainer-nodeport.yaml
$ kubectl apply -f portainer-nodeport.yaml
# If it says it not exposed
# microk8s kubectl expose deployment portainer --type=NodePort
E2. Install Linkding ( Bookmark Manager )
Linkding is a self-hosted bookmark service : sissbruecker/linkding

# I m installing linkding with persistent storage ( To know about What persistent storage is, check out my Kubernetes 101 post )

# YAML for Persistent Volume ( pv.yml )
---
apiVersion: v1
kind: PersistentVolume
metadata:
  name: data
spec:
  accessModes:
    - ReadWriteOnce
  capacity:
    storage: 8Gi
  hostPath:
    path: /home/user/data
  storageClassName: development
---

# YAML for Persistent Volume Claim ( pvc.yml )

---
apiVersion: v1
kind: PersistentVolumeClaim
metadata:
  name: data
spec:
  accessModes:
    - ReadWriteOnce
  resources:
    requests:
      storage: 1Gi
  storageClassName: development
---

# YAML for Linkding Container Deployment  ( Install Linkding With Persistent Storage )
---
apiVersion: apps/v1
kind: Deployment
metadata:
  name: linkding
  labels:
    application: frontend
spec:
  replicas: 1
  selector:
    matchLabels:
      application: frontend
  template:
    metadata:
      labels:
        application: frontend
    spec:
      containers:
      - name: linkding
        image: sissbruecker/linkding
        ports:
        - containerPort: 9090
        imagePullPolicy: IfNotPresent
        volumeMounts:
        - name: data
          mountPath: /etc/linkding/data
      volumes:
        - name: data
          persistentVolumeClaim:
            claimName: data
---

--------------------------------------------------------------------------------------
## Create Deployments
$ kubectl apply -f ./pv.yml
$ kubectl apply -f ./pvc.yml
$ kubectl apply -f ./linkding.yml

# Apply Deployments
$ kubectl get deployments
NAME       READY   UP-TO-DATE   AVAILABLE   AGE
linkding   1/1      1            1          102s

# Expose to the local network
$ microk8s kubectl expose deployment linkding --type=NodePort

# Get the Port
$ kubectl get svc
NAME         TYPE        CLUSTER-IP      EXTERNAL-IP   PORT(S)          AGE
linkding     NodePort    10.152.183.77   <none>        9090:31071/TCP   30s

# Access the Linkding Bookmark Manager ( http://10.0.1.86:31071 )

--------------------------------------------------------------------------------------
# To create username password for Linkding ( Go to Portainer -> Application -> Linkding -> Console Access
# python manage.py createsuperuser --username=user --email=admin@example.com
# user = user
# password = you set in above command
E3. Install CodeServer
CodeServer is nothing but VS Code on the browser ( To use on any machine anywhere and access it in the browser. ) : codercom/code-server
## Installing code-server with persistent storage, because this gives us the freedom to access code files from desired directories

--------------------------------------------------------------------------------------
# We already create PersitentVolume, but we need another claim for VSCode

# YAML for Persistent Volume Claim ( code-server-pvc.yml )
---
apiVersion: v1
kind: PersistentVolumeClaim
metadata:
  name: code-data
spec:
  accessModes:
    - ReadWriteOnce
  resources:
    requests:
      storage: 3Gi
  storageClassName: development
---

# YAML for code-server container deployment

---code-server.yml
apiVersion: apps/v1
kind: Deployment
metadata:
  labels:
    app: code-server
  name: code-server
spec:
  selector:
    matchLabels:
      app: code-server
  replicas: 3
  template:
    metadata:
      labels:
        app: code-server
    spec:
      containers:
      - image: codercom/code-server:latest
        imagePullPolicy: IfNotPresent
        name: code-server
        env:
        - name: PASSWORD
          value: "password"
        volumeMounts:
        - name: data
          mountPath: /home/coder/project
      volumes:
        - name: data
          persistentVolumeClaim:
            claimName: code-data
---

--------------------------------------------------------------------------------------
# Apply Deployments
$ kubectl apply -f ./code-server-pvc.yml
$ kubectl apply -f ./code-server.yml

# Expose to internal network
$ kubectl expose deploy code-server --type=NodePort --port=80 --target-port=8080
# Access the server on http://10.0.1.86

# To Scale the deployment
$ kubectl scale deployment code-server --replicas=5
Conclusion
You should now have an operational Kubernetes master and several worker nodes ready to accept workloads.
I hope MicroK8 will be a great help for newcomers into Kubernetes to try it out and learn Kubernetes by playing with it. If you gave it a shot & liked it, leave me a comment here!